set cursorline          " highlight current line
hi CursorLine   cterm=NONE ctermbg=235 ctermfg=NONE guifg=gray guibg=black
set cursorcolumn        " vertical cursor line
hi CursorColumn ctermfg=NONE ctermbg=235 cterm=NONE guifg=gray guibg=black gui=boldKubernetes Basics for Connections Admins
Christoph Stoettner
 +49 173 8588719  |
|
Agenda
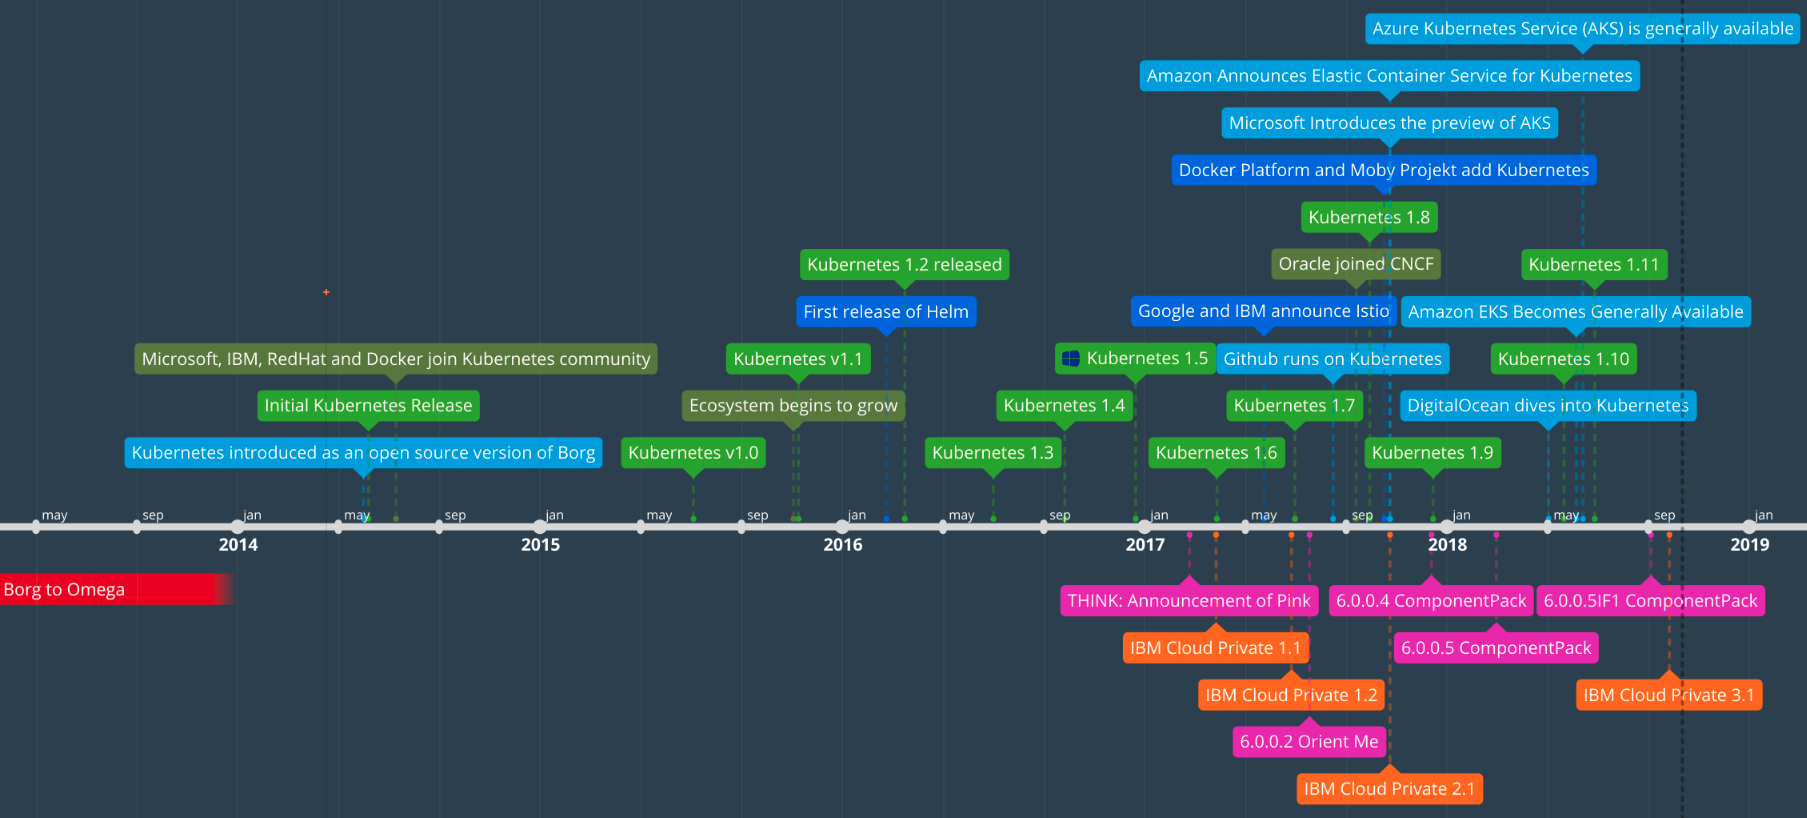
History
Kubernetes Infrastructure
kubectl
Why do we talk about Kubernetes?
TPFKAP
| The Product Formerly Known As Pink |
First rumours end 2016
Announced during Think 2017 (February 2017) in San Francisco
Migration of the monolithic WebSphere stack of IBM Connections
Lots of advantages
Zero Downtime updates
More frequent updates (Continous Delivery)
Moving away from Java (expensive Developers)
Drop the support of three different Database engines
History - Borg System
2003 / 2004
First unified container-management system
Developed at Google
Based on Linux control groups (cgroups)
Container support in the Linux kernel became available
Google contributed much of this code to the kernel
| Isolation between latency-sensitive user-facing services and CPU-hungry batch processes |
History - Omega
2013
Offspring of Borg
Improve the software engineering of the Borg ecosystem
Built from ground up
more consistent, principled architecture
Seperate components which acted as peers
Multiple schedulers
No funneling through centralized master
History Kubernetes
June 2014
Third container management system developed at Google
Conceived and developed when external developers became interested in Linux containers
Google released the code as Opensource to the Cloud Native Computing Foundation (CNCF)
Around six weeks after the release:
Microsoft, IBM, Red Hat and Docker joined the Community
Overview
Dynamic Timeframe
Kubernetes
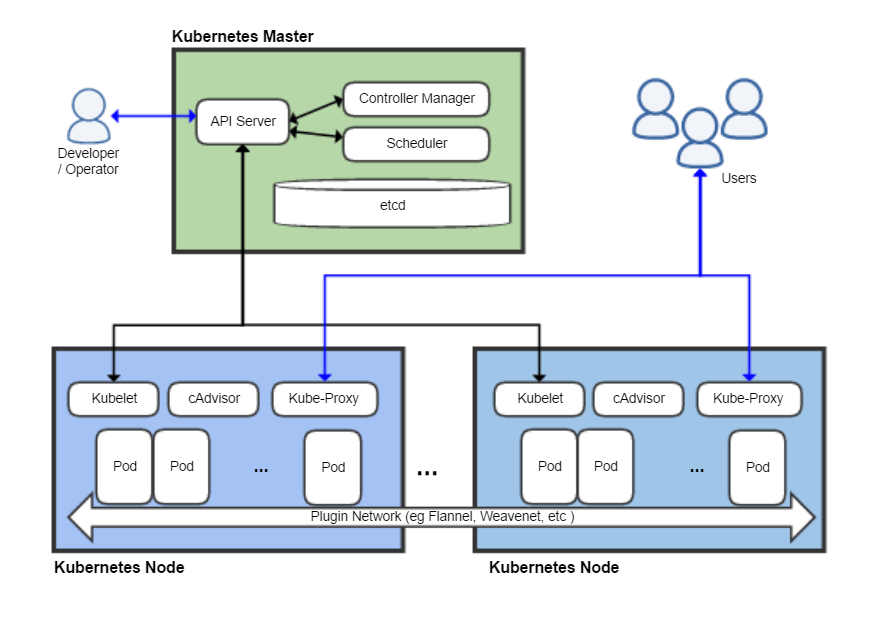
Kubernetes Architecture
Linux Kernel
Namespaces
lightweight process virtualization
Isolation: enable a process to have different views of the system than other processes
Much like Zones in Solaris
No hypervisor layer!
cgroups (control groups)
Resource Management providing a generic process-grouping framework
| Cgroups is not dependent upon namespaces. |
Container
A container is a Linux userspace process
LXC (Linux Containers)
Operating System Level virtualization
Docker
Linux container engine
Initially written in Python, later in Go
Released by dotCloud 2013
Docker < 0.9 used LXC to create and manage containers
Pods
Pods are the smallest unit in Kubernetes
Have a relatively short life-span
Born, and destroyed
They are never healed
|
YAML with VIM
.vimrc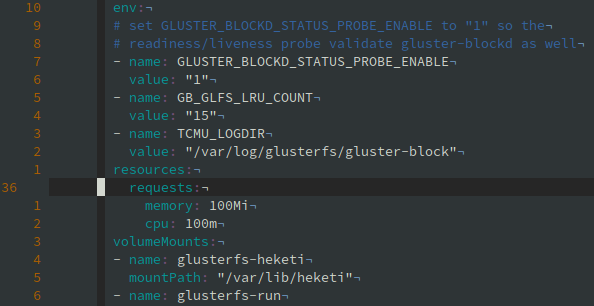
YAML → or use a ruler
Simple Pods
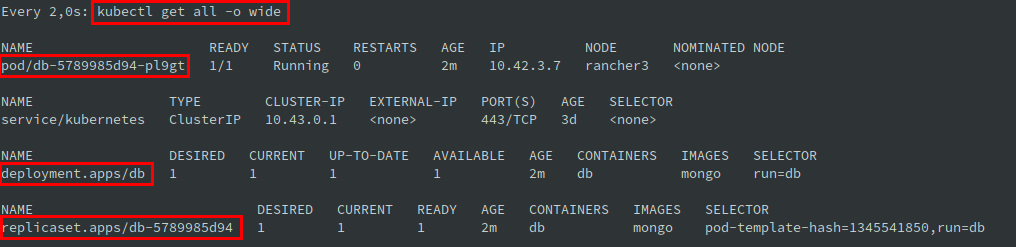
Run a simple pod
kubectl run db --image mongo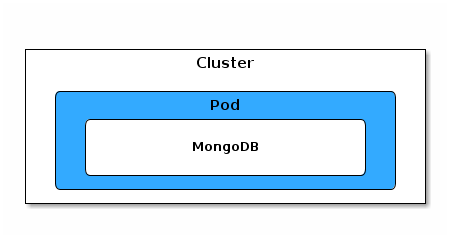
| Quick and dirty! Deprecated! |
Simple Pod - what happend?
Kubernetes automatically creates
ReplicaSet
Deployment
Create a pod with a yaml file
nginx.yamlapiVersion: v1
kind: Pod
metadata:
name: nginx
spec:
containers:
- name: nginx
image: nginx:1.7.9
ports:
- containerPort: 80$ kubectl create -f nginx.yaml
$ kubectl get all -o wide
NAME READY STATUS RESTARTS AGE IP NODE
pod/nginx 1/1 Running 0 4m 10.42.1.13 rancher2Overview creating pod
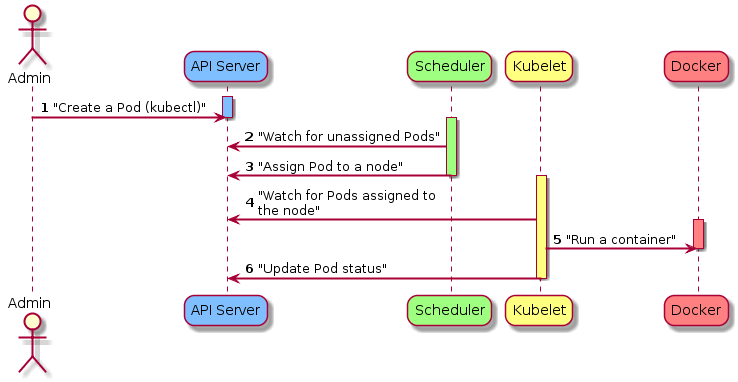
kubectl create pod -f pod.yml |
Liveness Check
...
    - containerPort: 80
    env:
    - name: nginx
      value: localhost
    livenessProbe:
      httpGet:
        path: /              (1)
        port: 80
      initialDelaySeconds: 5 (2)
      timeoutSeconds: 2      (3)
      periodSeconds: 5       (4)
failureThreshold: 1 (5)| 1 | Check path - example with non existend path |
| 2 | Wait 5 seconds before performing the first probe |
| 3 | Timeout (no answer for 2 seconds → error) |
| 4 | Liveness check all 5 seconds |
| 5 | Kubernetes tries n times before giving up |
Automatic restart
Check Events

$ kubectl describe nginx-broken
Pods vs Container
Pod is smallest deployment in Kubernetes
A pod contains minimum one container (Docker or RKT)
Can contain multiple containers
Not very common
Most pods have one container
Easier to scale
A pod runs on one node and shares resources
ReplicaSet
ReplicaSet as a self-healing mechanism
Pods associated with a ReplicaSet are guaranteed to run
| ReplicaSet’s primary function is to ensure that the specified number of replicas of a service are (almost) always running. |
ReplicaSet (2)
$ kubectl create -f nginx-rs.yaml --record --save-config  (1) (2)

$ kubectl get pods

NAME                  READY   STATUS    RESTARTS   AGE   IP           NODE       NOMINATED NODE
pod/webserver-79r7j   1/1     Running   0          15m   10.42.3.15   rancher3   <none>
pod/webserver-dg5bp   1/1     Running   0          15m   10.42.2.11   rancher4   <none>
pod/webserver-rmkgx   1/1     Running   0          15m   10.42.1.14   rancher2   <none>

NAME                      DESIRED CURRENT READY AGE CONTAINERS IMAGES       SELECTOR
replicaset.apps/webserver 3 3 3 15m nginx nginx:1.7.9 service=nginx,type=backend| 1 | --record saves history |
| 2 | --save-config enables the use of kubectl apply, so we can change the ReplicaSet |
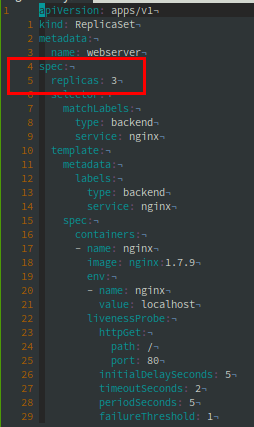
ReplicaSet Scale
Change
Replicas to 9Apply file
...
spec:
  replicas: 9
$ kubectl apply -f nginx-rs-scaled.yaml
NAME READY STATUS RESTARTS AGE IP NODE NOMINATED NODE
pod/webserver-bw259 1/1 Running 0 5m 10.42.1.15 rancher2 <none>
pod/webserver-frcr7 1/1 Running 0 4m 10.42.1.16 rancher2 <none>
pod/webserver-g6zqd 1/1 Running 0 5m 10.42.2.12 rancher4 <none>
...
pod/webserver-p6k7f 1/1 Running 0 4m 10.42.2.13 rancher4 <none>
pod/webserver-wjwfd 1/1 Running 0 5m 10.42.3.16 rancher3 <none>
NAME DESIRED CURRENT READY AGE CONTAINERS IMAGES SELECTOR
replicaset.apps/webserver 9 9 9 5m nginx nginx:1.7.9 service=nginxDeployment
Not supposed to create Pods directly or with ReplicaSet
Use Deployments instead
$ kubectl create -f nginx-deploy.yaml --record

$ kubectl get all

NAME                         READY   STATUS    RESTARTS   AGE
pod/nginx-54f7d7ffcd-wzjnf   1/1     Running   0          1m

NAME                    DESIRED   CURRENT   UP-TO-DATE   AVAILABLE   AGE
deployment.apps/nginx   1         1         1            1           1m

NAME                               DESIRED   CURRENT   READY   AGE
replicaset.apps/nginx-54f7d7ffcd 1 1 1 1mnginx-deploy.yamlapiVersion: apps/v1
kind: Deployment
metadata:
name: nginx
spec:
selector:
matchLabels:
type: backend
service: nginx
template:
metadata:
labels:
type: backend
service: nginx
spec:
containers:
- name: nginx
image: nginx:1.7.9
ports:
- containerPort: 80
protocol: TCPScale, Rollout and Undo
$  kubectl create -f nginx-deploy.yaml --record
$  kubectl apply -f nginx-deploy-scaled.yaml
$  kubectl scale deployment nginx --replicas 9 --record
$  kubectl scale deployment nginx --replicas 5 --record
$  kubectl rollout history -f nginx-deploy.yaml
$  kubectl set image -f nginx-deploy-scaled.yaml nginx=nginx:1.8.1 --record
$  kubectl rollout history -f nginx-deploy.yaml
$ kubectl rollout undo -f nginx-deploy-scaled.yaml --to-revision=1Kubernetes Networking model
all containers can communicate with all containers without NAT
all nodes can communitcate with all containers without NAT
the IP that a container sees itself as the same IP that others see it
this is provided through overlay network providers like
Flannel (Overlay network provider)
Calico (secure L3 networking and network policy provider)
Canal (unites Flannel and Calico)
| Exposed ports are accessible from all containers/pods. |
Istio
service mesh
microservices
secure
connect
monitor
Automatic load balancing for HTTP, WebSocket and TCP traffic
Fine grained traffic control
Policy layer
| Secure service-to-service communitcation in a cluster |
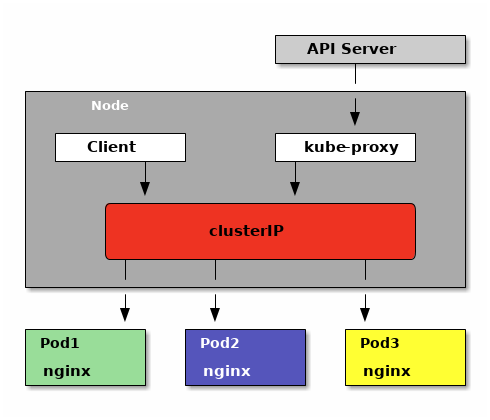
Services
Kubernetes Services provide addresses through which associated Pods can be accessed
Services are resolved by
kube-proxy
apiVersion: v1
kind: Service
metadata:
  name: nginx
spec:
  type: NodePort  (1)
  ports:
  - port: 80
    nodePort: 30001 (2)
    protocol: TCP
  selector:
service: nginx| 1 | NodePort: available within the cluster and from outside on each node |
| 2 | explicit port, without Kubernetes creates a random one |
NodePort
Port is exposed on each Node’s IP at a static port
A
ClusterIPservice is automatically created
| No need that the pod is running on the node! |
$ kubectl scale deployment nginx --replicas 1 --recordOur nginx pod is only running on of the the three worker nodes
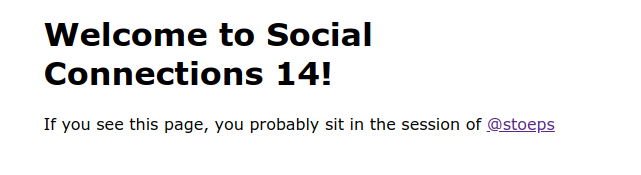
Check if all workers deliver the webpage
for i in 2 3 4
do
    curl -s http://rancher$i.stoepslab.local | grep title
done
<title>Welcome to nginx!</title>
<title>Welcome to nginx!</title>
<title>Welcome to nginx!</title>
ClusterIP
Exposes the service on a cluster-internal IP
makes the service only reachable from within the cluster
default
ServiceType
Ingress
Route requests to services, based on
request host
path
apiVersion: extensions/v1beta1
kind: Ingress
metadata:
  name: my-ingress
spec:
  rules:
  - host: www.stoepslab.local
    http:
      paths:
      - backend:
          serviceName: nginx
          servicePort: 80
Working Ingress
After adding the hostname to DNS or
/etc/hosts

Storage / Volumes
Docker knows a concept of volumes
More complicated on Kubernetes
Different nodes need to have access to them
Network storage
Kubernetes knows a lot of different storage types
Examples:
local, iscsi, glusterfs, hostPath, nfs
configmap, secret
different cloud providers (aws, gce …)
Persistent Volume
Persistent Volume (PV)piece of storage in the cluster
provisioned by an administrator
PersistentVolumeClaim (PVC)request for storage by an user (size and access mode)
PVC consume PV resources
PV have different properties
performance, backup, size
Cluster Admins need to be able to offer a variety of PersistentVolumes |
StorageClass
StorageClass: a way to describe theclassesof storagedifferent classes for
quality-of-service levels
backup policies
Reclaim Policy
Delete or Retain
Some storage classes auto provision
PersistentVolumesHeketi/Glusterfs, Rancher/Longhorn
NFS on one of your K8s nodes → single point of failure |
ConfigMaps
decouple configuration artifacts from image content
keep containerized applications portable
Configmaps can contain
folder/files (mainly for config/properties)
kubectl create configmap nginx-soccnx --from-file=html
    spec:
      containers:
      - name: nginx
        image: nginx:1.7.9
        volumeMounts:
          - name: nginx-soccnx
            mountPath: /usr/share/nginx/html
      volumes:
        - name: nginx-soccnx
          configMap:
            name: nginx-soccnx
ConfigMaps (2)
Value pairs
apiVersion: v1
   kind: ConfigMap
   metadata:
     name: special-config
     namespace: default
   data:
     SPECIAL_LEVEL: very
     SPECIAL_TYPE: charm
spec:
containers:
- name: nginx-soccnx
image: alpine:latest
command: [ "/bin/sh", "-c", "env" ]
envFrom:
- configMapRef:
name: special-configConfigMaps results
index.htmlin a configMap
kubectl logs nginx-soccnx...
PATH=/usr/local/sbin:/usr/local/bin:/usr/sbin:/usr/bin:/sbin:/bin
PWD=/
SHLVL=1
SPECIAL_LEVEL=very
SPECIAL_TYPE=charmSecrets
object that contains a small amount of sensitive data
reduces risk of accidental exposure
Secrets are base64 encoded
$ kubectl create secret generic db-user-pass \
  --from-literal=username=dbadmin \
  --from-literal=password=MyGreatPassword
secret 'db-user-pass' created

$ kubectl create secret generic db-user-env \
--from-env-file=password.txtpassword.txtusername=dbadmin
password=myGreatPasswordGet secrets
➜ kubectl get secret db-user-env -o yaml
apiVersion: v1
data:
  password: TXlHcmVhdFBhc3N3b3Jk
  username: ZGJhZG1pbg==
kind: Secret
➜ kubectl get secret db-user-env -o jsonpath="{.data.password}" | base64 --decode
MyGreatPassword%Mount secret into pod
volumes:
- name: db-creds
    secret:
      secretName: db-user-env
      defaultMode: 0444
      items:
      - key: username
        path: username
      - key: password
        path: password
Secrets compared with ConfigMaps
Both allow to inject content into pods
files
literal values
files with environment variables
Secrets
creates files in
tmpfs→ in memory files
A step towards security, but should be combined with
authorization policies3rd party tool: Hashicorp Vault
| Any user with permission to run pod can mount a secret. |
Namespaces
Namespaces are a way to devide cluster resources between multiple users
Namespaces provide a scope for names
Names of resources need to be unique within a namespace
It’s not necessary to use multiple namespaces just to seperate different resources
use
labelsto distinguish resources within the same namespace
| When you delete a namespace, all objects in the namespace are deleted too! |
Namespace and kube-dns
You can reuse pod and service names in different namespaces
kube-dnsusespodname.namespacethen
Example
$ kubectl exec -it <pod> -- sh

curl http://nginx.texting:8080
curl http://nginx.production:8080
Namespaces are no extra security layer!
Pods can connect to services and pods in other namespaces
kubectl config
When you use
kubectlyou have to add-n namespaceor
--all-namespaces(works only withget)
During configuration phases it’s easier to switch the default namespace
Very handy if you use different clusters too
$ kubectl create namespace soccnx

$ kubectl config set-context soccnx --namespace soccnx \
  --cluster rancher-cluster --user admin

$ kubectl config view

$ kubectl config use-context soccnx
Install additional products
Helm
Kubernetes Package Manager
manage Kubernetes charts
Charts are packages of pre-configured Kubernetes resources
Main tasks
Find and use popular software packaged as Helm charts
Share your own applications as Helm charts
Create reproducible builds of your Kubernetes applications
Manage releases of Helm packages
2 parts
client (helm)
server (tiller)
Examples
Install a Docker registry
Use ELK or EFK Stack for your logfiles
GUI within IBM Cloud Private or Rancher
➜ helm search elastic

➜ helm install stable/kibana
Troubleshooting
Get log messages
kubectl logs <podname>kubectl logs <podname> -fMultiple containers in your pod?
kubectl logs <podname> -c <containername>Log of a restarted pod
kubectl logs --previous ${POD_NAME} ${CONTAINER_NAME}Troubleshooting Pod
Get a shell in a running pod
Depending on the image:
/bin/sh,sh/bin/bash,bash/bin/ash,ash(alpine)
# Single container pod
kubectl exec -it shell-demo -- /bin/bash

# Pod with multiple containers
kubectl exec -it my-pod --container main-app -- /bin/bash
+49 173 8588719 |  |
@stoeps
Social Connections 14
#kubernetes101
